The Old Car
Chronicles
last modified
This is a documentation of the saga of rebuilding the motor from my 1958 Ford Thunderbird in the winter of 2005-6.
Background
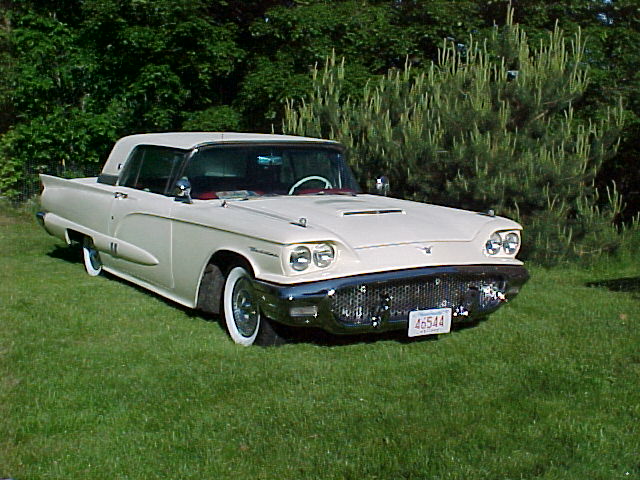
I purchased a 1958 Ford Thunderbird in May of 2002 (#8452 in the Thunderbird Registry). My father had owned an identical one in the early ‘60s and it was the first car that I drove. An act of literally blind faith, I bought the car on Ebay for $5200 as it had all the same characteristics as my fathers and appeared to be in good shape. It arrived by flatbed with 55,000 miles indicated on the odometer.
From the Outside In
While it looked good, very little worked. None of the instruments worked. It needed a dash pad, a job of no small magnitude.
Driving it the first time was an eye opening experience. I live in the country with less than great roads. I could simply not believe how bad it handled!!! Were they really like this?? The main problem was an ancient set of bias ply tires that were irregularly worn and appeared to be concrete.
Cosmetically it was not bad to work on. I got a dash pad on Ebay and carefully fit it in to look quite good. Having the bumpers restored gave a whole new degree of elegance to the appearance and whole new meaning to the word expensive. A set of radial ply reproduction tires gave it a nice ride. It already had new seat covers and carpet, and the interior chrome was good so once the dashpad was in, the interior was really nice!
The longer I owned it the harder it was to start.
It had
received a tuneup (plugs, points, cap and rotor) so this was perplexing. At long last I found the problem: someone put
the plugs in without gapping them!! They
had a gap of .048”. This was
fine perhaps for a car with a modern
ignition system and great spark, but not good for a 1950s ignition
system. I
changed the gap to .035” and it started great all the time thereafter.
Gotta
admit I feel dumb for looking at the plugs but not the gap. Never
take anything for granted… never.
The air filter had a story… it was filthy not only on the outside but also the inside. The latter is bad news. It means you have dirt going down the carb into the motor. This can mean bad things for the rings. It also means someone did not give a damn about it so what else was poorly maintained? Oil?? Tranny?
To be nice to it, in the fall of 2002 I took it into a local transmission shop to have the transmission checked out. It shifted fine but I know next to nothing about automatic trannys hence a stop. Dan, tranny guru, took it out and drove it with good results. Then he dropped the pan to change the fluid and check things out. Bad news…hunks of metal in the pan. So it went in the shop for 10 days to have the unit pulled and rebuilt.
What did they find? The tranny had been rebuilt once already. There are something like 5 plates in one. They are either all flat or all convex. Except mine were a mix. They are either all steel or all brass. Except mine were a mix. Not exactly a formula for success!! So $1100 later it was first rate once again…. Take nothing for granted….
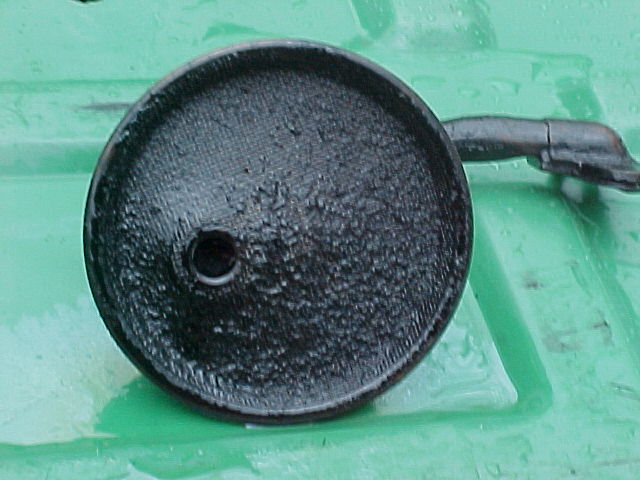
In the winter of 2002-3 I took the oil pan off to see what the pickup looked like after Alexander had mentioned that his was full of crap not long before his motor threw a rod…. Hmmm sounds like good advice. The result, shown below, was a pickup almost totally clogged with deposits. Death was near!!!
while up close, after cleaning, it looks like this:
In due time I got it running pretty well. The only real problem was that no matter what I did, it burned oil. One quart every 125 miles, like clockwork. Everyone kept telling me the reasons: an oil leak, filler cap, downdraft hose, valve stem seals…. I repaired almost all of them but never made a dent in the oil use.
Oil pressure will be interesting to see once the motor is rebuilt. The old motor, with 10W-30 oil and a tired pump, produced 32 psi when hot at 2000 RPM,
and a scant 10 psi at idle. The shop manual would like to have seen 45-50 psi at 2000 rpm. Once I found that, as a temporary measure until the motor was rebuilt, I put a new oil pump in and went to 20W-50 oil. Pressure went up and the motor sounded better. I should install a permanent oil pressure gauge under the dash…
Compression was checked in the fall of 2004. Not bad, averaging in the 140s while the shop manual said 180 +/- 20. Pretty uniform. No disasters. Plugs looked great.
In the summer of 2005, I drove to
Rebuilding it??
Wanting to rebuild it was easy. Where to do it was not. I do not have a garage where I can both pull the motor up and keep the car inside. Tried like heck to work it out but it was not going to happen, and I was not going to leave the car outside for any length of time. The car is pretty much rust free but highly vulnerable.
In the Fall of 2005 I finally worked out the logistics: a neighbor Ray had a garage well set up to remove the motor. My stepson had a garage for dismantling it and access to a machine shop for working on it. My neighbor did not mind having the car in his garage for a month or more.
Getting Going
The garage in question had been built over 20 years
ago for
my neighbor to work on cars on a full time basis. It is a one car, 28’ long and 18’ wide. It is insulated and
has a small wood stove (a crucial item in
I offered to help him clean it as it was full of clutter. Least I could do. I put in about 3 hours a day for 3 days while he put in even more. Lots of stuff…. A 305 Chevy motor, a motor from a 1984 Ford Something, a crankcase from a Model A Ford, an antennae from a 1963 Falcon. Hundreds of new brake pads with no means of identification (“they were in the trunk of some car so I kept ‘em”). Many ingeniously home made tools. Two pieces of chrome (“don’t throw those out! Banana seat for a bicycle. Worth $1 to somebody at a lawn sale”).
Finally it was clean. I could just feel my hands on the tools removing the motor!
Not so fast. A person he knew came limping in with a 2002 Impala, motor shot. He got the motor out (crank shot), and got another motor at a salvage yard. Not bad… except that with the new motor, it wouldn’t start, a flaw hard to overlook. Another day or twos work revealed the catalytic converter plugged. Pretty poor for a one owner car with 90,000 miles on it. Finally it departed and the garage was mine.
Pulling the Motor
Jan 18
I drove it in and began removing components, bagging bolts in plastic bags and labeling them. I probably put in 3 to 4 hours doing this. A good friend, Mike, came by and helped by unhooking the exhaust and the flywheel. The weather was warm and the little woodstove well up to the task. I bought a big box of sealable food bags, some laundry pens and a stack of index cards. Any group of bolts got tossed into a bag with an index card telling where they went in bright letters. A few notes on the wiring to the generator. Remarkably few tools needed. A few sockets and combination wrenches and that’s it. No special tools to be hunted down or borrowed.
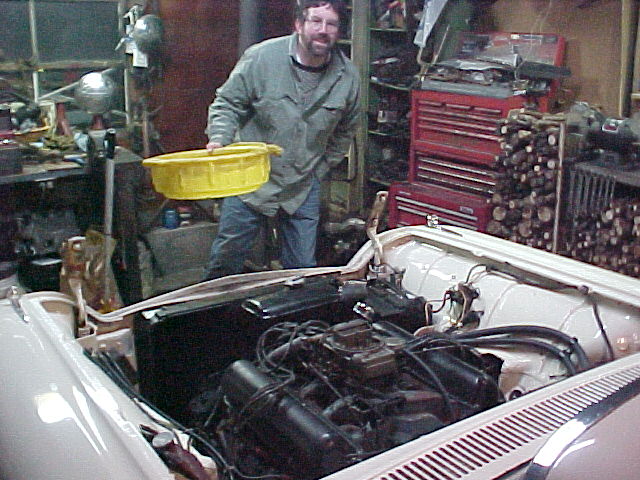
Mike and Antifreeze pan
Getting the antifreeze out is no small feat. Easy to drain the radiator but a lot stays in the motor. We stuck a hose in and siphoned another gallon out.
Finally the motor was free and stripped of everything except the intake manifold. When Ray built the garage he spent $10 at a local saw mill and bought a 6x6 beam to go across the garage at just the right spot. He also has a very nice chain fall which appears to have terrific gear ratios in it. Soon the old motor was up and out.
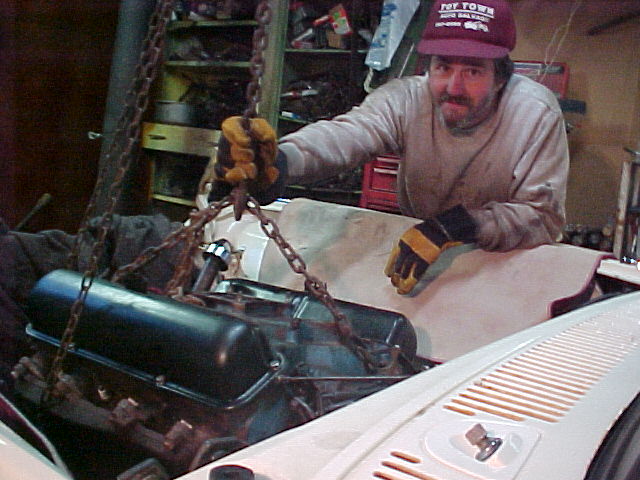
Ray with the very tired TBird 352.
Jan 20
Now to move the TBird and load the motor into a truck. The transmission is a problem but an 18” 2x4 held it up nicely and we pushed the chassis out of garage.
We lowered the motor onto an old radial tire in the back of a Chevy S-10 and kept it in place with 3 tie-downs. The TBird went back into the garage surrounded by the small army of components that came from it.
We noted that it needed a new flywheel as some of
the
starter teeth were beaten up and this was the time for such repairs. Up
to

Steve and the still tired 352 (but
with a nice
oil pan!)
Breaking the motor
down
So why did it burn oil?? The answer to the question
was
getting near. Up to
Jan 22
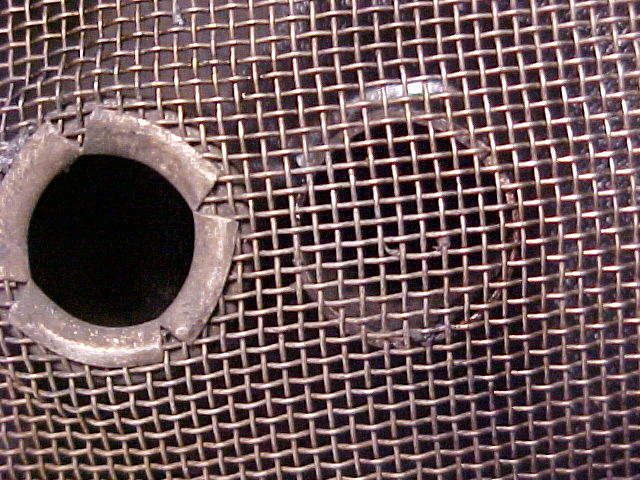
Finally to the pistons. Bad news here. A critical measurement in a piston is the clearance between the compression ring and the groove it sits in, measured vertically. Should be in the range of .001 to .003”. More than that and rings are jumping all over the place and oil is getting by. Mine exceeded .015” in come cases. No, that’s not a misprint. This is mainly due to wear on the tops of the rings, not the pistons. The following photo is worth looking at :
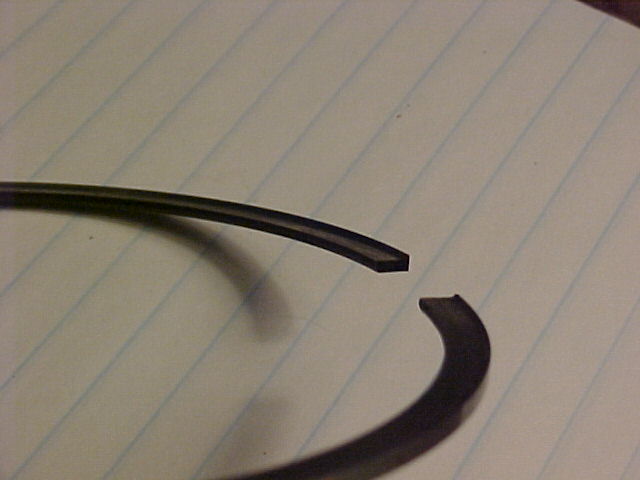
where you need to remember that the ring originally was flat!! The wear is from .010 to .020 on different rings!! This is the top compression ring, by the way.
Perhaps as a result of the huge clearance, in 3 cylinders the top rings were broken in half. One piston had a broken skirt. Piston to wall clearances were not bad.
The camshaft and lifters looked very good. All lifters had flat faces. All pushrods were straight.
Some evidence: the gaskets on the intake manifold said “FelPro”. Doubtful that Ford used them as a supplier in 1958. So the guess is that someone put cam and lifters in at some point as they probably got noisy.
Crank looked used but salvageable.
So the crank, block and heads went off to a machine shop for lots of TLC. One head would also stop at a torch wiz to have one exhaust manifold removed that had original bolts still holding it to the head (even had the little tabs).
Rounding up the parts
While those components were off for rebirth, other work was needed: parts had to be rounded up and the engine bay cleaned up.
For parts, a flywheel was needed. Also a heat riser. At the bottom of the radiator are three special nuts that were gone. Since the starter motor was out, it seemed a good time to have it checked over.
The oil pan, which I had stripped and painted two years ago, had a big area with the paint flaking off. Why? The two transmission lines next to it (which go to the radiator) had rusted out and begun to seep. They would have to be replaced.
I emailed Pat Wilson’s in NJ with a list. They had a flywheel, pulley for the power steering (someone had put a jack under it at some point), and the radiator nuts. I quickly sent them a money order. Progress being made!
I took the starter motor to an old fashioned shop
in
I had mailed the money order to Pat’s on Saturday so I was surprised to get a package from them on Tuesday morning. The UPS driver hollered “be careful picking it up!!” as he left the yard. OK… The flywheel came out of one side of a sheet of cardboard someone had folded in half and put some tape over. Cheap, brown, plastic tape. The flywheel probably weighs 10 pounds so it was easy for it to break the tape. But I had it and that was the goal. Where were the other parts?? A packing slip suggested the other items I had ordered were there but no sign. Either a) they fell out or b) they never got sent. The pulley is decent sized. Sad to think they might be on the floor of some UPS warehouse to get tossed out. An email is sent to Pat’s to see the status of things…time will tell. The pulley was $55 so that is no small matter. Too bad someone at Pat’s could not bother to find a real box.
I took the tranny lines to Ken Stewart in
The Mighty Intake
Manifold
The intake manifold, initially, simply demanded
cleaning and
restoration. I had gone to the trouble of tracking down the right paint,
So…to clean the manifold. The underside revealed a sheet metal plate. It was held on by some funny spiral screws which succumbed to a punch. Lots of burnt oil underneath so this was good progress.
But no…not so fast. Alexander said that the hex plug in the middle, under the carb, had to come out to complete the job. Oh, and he never got his out, a machine shop had to drill it to death and then make up a replacement from some Home Depot plumbing part. Swell.
Had to try. Put a 5/8” Allen wrench into it and a
tire iron
on the Allen. No luck. Penetrating oil.
No luck. Propane torch… like tossing
handfuls of sand into the
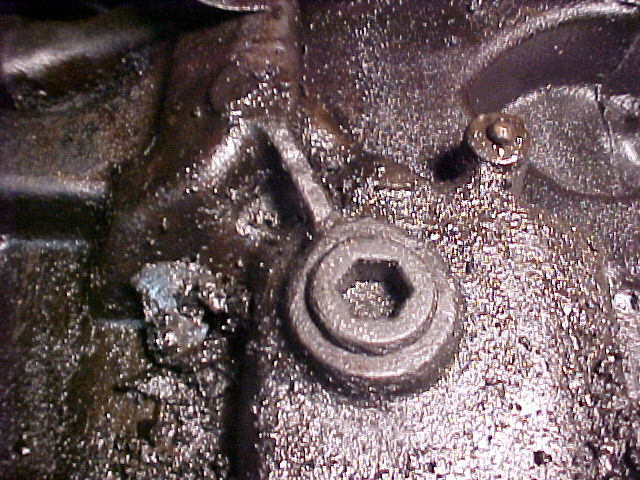
So…either try the Acetylene torch or give up early and drill it out. Leaning towards the latter. If I fabricate a replacement I can rest assured no one will ever see it!! Jimmy Hoffa is not hidden as well as that fitting. One other thing to Alexander and Casey: there damn well better be a lot of carbon inside that fitting!!! That’s all I have to say…
The oil pan is ready… I had stripped it two years ago and repainted with Rustoleum Sky Blue (7724) which looks great, like Ford, and hooks on really well as evidenced by the effort it took the sandblaster at work to get it off. Can’t use it on the heads or block but for anything else, if you have a ’58, this is good stuff!! The timing chain cover is done.
I had replaced the water pump as the shaft had some play in it. The one from the auto parts store had a green paint and clear coat on it which I left. But now its time to do things right, so I masked off the openings and blasted away. Took it home and turned the shaft. SCRATCH SCRATCH. Damn…some sand got into something. I found one small opening on the front that I had missed. Blew it out and it turned smoothly.
The water pump will get a 6 blade fan for better cooling when it goes back on.
Getting Paint
I knew long ago that I wanted to paint the motor. I also knew it was no trivial matter due to the heat, so just the right paint was in order. Wish I knew what. Can’t be hard…car guys do this all the time. Look under anyone’s hood at a car show.
Nov 1 According to Hemmings, Bills in NJ specialized in engine paints good to over 1300 degrees. I emailed and asked if they had paint for the motor on a 58 TBird and they said yes, so I ordered 3 cans along with manifold paint. It arrived shortly thereafter and I tried a shot of blue out. Way too dark, not even close. So the three cans went back and I was back to square one.
Dec 10 Jack
volunteered that he used the aforementioned DupliColor so I was hot on
the
trail. The web said that
So I trotted up to the door of the autoparts store, gave a big yank and almost pulled my shoulder out of the socket. “Closing on Nov 15 and moving”. Gee, thanks for telling me. (this was Dec 20) However I was going by WalMart on the way home and it turned out that yes, THEY had it and it was $3.50 a can! I bought three. What the guys at the auto parts store did not know was that not only was I going to buy the 3 measly cans of paint from them but also all my engine parts. Good idea…hide from your customers. Move now and then and keep ‘em off balance. Don’t tell ‘em when you move. Kind of like Whitey Bulger or Yasser Arafat. (you have to be from MA to know who Whitey is…)
January 31.
I am well into the project but have a
long ways to go. Tomorrow I will work on the engine bay for awhile. The
area
around the steering is a mess, mostly from the master cylinder leaking
DOT 3
over the years, which attacks paint. I have since replaced the master
cylinder
and switched to DOT 5 (harmless to paint) but the area is still a mess.
As the
car is white, everything shows up.
The steering column needs a new gasket assembly on the fire wall. Not
sure how
this will work out without taking the steering column out (which I
really,
really do not wanna do). Stay tuned.
Feb 1: Pat Wilson’s emails to tell me then sent all the parts I ordered which means all but the flywheel got lost….Their packaging is nothing short of terrible- fold over a piece of cardboard and wrap some tape around it, cheap tape. Flywheels eat through tape easily…
Dan Stewart tells me to try Acetylene on the manifold.
Ordered a heat riser as the coil mechanism on mine is long gone. I have a stock FOMOCO carb to put on at some point and this requires a functioning heat riser.
Feb 2:
Got the fitting out of the intake manifold by drilling it out…heat did not work. No carbon in the chamber perhaps because the heat riser did not work because the spring was long gone…who knows?
Now to find a replacement. A 59 cent 1” pipe plug fits the hole perfectly but sticks out way too far so no good. Idea: some kind of rear end plug might do the job.
Good news: Pat Wilson’s is resending my parts that got lost. Danielle is pulling them herself from some car in the yard. Versatile woman.
Bad news: MAC’s emails to tell me they do not have the heat riser that I ordered on-line and will not for 3 weeks. Sorry guys… I cancelled the order. Called Concours Parts and asked them to verify they had one. $10 cheaper than MAC’s anyways.
Will take the pipe plug into the local auto parts store tomorrow and see if they can come up with something appropriate, but feel the problem will get solved. For the hell of it I put a posting on two web sites (FE Forum and Two Guys Garage) to see if anyone had solved this problem. The parts manuals for TBirds don’t even show the part as existing!!!
Steve is supposed to remove the right side exhaust manifold tonight with the help of a friend with a plasma torch. A small but important step.
Most of this project is lots of small, incremental steps. Many of those would not occur if I were either a professional or had done this before.
Good News: Steve from NH tells me my engine block is finished! This means it has been hot tanked, cleaned out, new freeze plugs, and been bored .030” over. Also new cam bearings The crank and head are still works in progress, but both are reasonably standard projects, so things are coming along.
Feb 3 Bad news. The pulley from Pat Wilson’s shows up but it is the wrong one, coming from the power steering pump, not the harmonic balancer… will send it back on Monday and provide digital pictures of the damaged one I own so as to perhaps end this ping-pong match with them.
Feb 5 A trip to NH gets the old bolts removed from the head and the exhaust manifold free. This did take an oxy-acetylene torch, with one still needing to be drilled out.
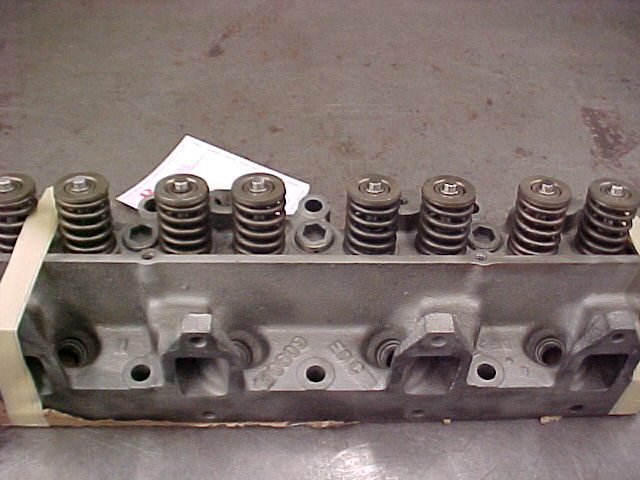
Looked at the heads with all of the valves removed. Some of the exhaust seats are very pitted!!! A rebuild was overdue!
Feb 7 Second manifold sandblasted. Two different sources turn up plugs for the underside of the intake manifold so that problem is pretty much history.
Feb 10 Another pulley shows up from Pat Wilson’s but it is from a 1961-4 TBird and too deep to be used with my setup. Back it goes. I dug up the part number and a very accurate sketch thanks to Alexander and Casey which were forwarded. Pretty hard to get it wrong this time.
Feb 14 The correct pulley shows up from Pat Wilson’s with an offer to refund my money if it’s wrong. They may make mistakes but they try hard to get it right, more than a lot of places.
I pick up the intake manifold and it is in very
clean
condition. An hour or so of work and it is ready for painting. Below is
the
dreary looking place that cleaned it, Metal
Strip of New England,

Feb 16 Got the oil pan and exhaust manifolds painted. I used Bill Hirsch’s super high temp grey manifold paint, put 3 thin coats on and baked it in my neighbor’s oven for an hour (he is remodeling his kitchen and graciously allowed this, more than my wife would). Maybe, just maybe, they will not rust anymore!! Even that was eventful. I bought the paint new last fall for something like $13 for a spray can. Took the plastic cover off after shaking for a minute and no nozzle!! Bummer!!
We dug through some old spray bombs and found one that fit so it all ended well. The Hirsch paint is supposed to be good to 1800 degrees so this should work out ok.
Steve from NH says that my crankshaft is not done although the block and heads are done. Things are busy in the machine shop so it may be a little while. This is ok as Ray does not need his garage and I have a lot of work to do on the engine bay.
For engine parts, I still have to paint the water pump and touch up the timing cover. The starter motor has been overhauled. the transmission lines are not done. So things are coming along reasonably well. It is 18 degrees and windy today and hard to picture driving the old car anyway.
Feb 19 Things going pretty well so time for something to go wrong. I decided to get the rocker arms/shaft assembly cleaned up and ready to put back on.
A little inspection reveals significant scoring on both the shafts and the insides of the rocker arms. These really ought to be replaced. New ones (2 sides) are in the ballpark of $300 so I need to consider all options. Shafts alone are cheap. If I were a machinist I would put new shafts in and put bronze bushings in the old rocker arms. On the good side, these are the last possible things that could be replaced. Everything else has either been replaced or overhauled. There is light at the end of the tunnel, but the path to it is littered with receipts for parts.
The poor oil that showed up in the strainer 3 years ago probably took its toll on the rocker arms as they rotated. You have steel on steel, too, which is not optimal. The clearances are about .003” with .006” being replacement time. Mine are ok for clearance but look terrible. In some cases they do not want to rotate 360 degrees very easily.
Feb 22 Picked up the starter motor at United Auto Electric. Looks like new, cost like new, end of story. Coupled with a new ring gear, the car should start easily for a long time.
Got all the covers painted: timing, oil pan, intake
manifold, water pump. All Ford
Blue.
Feb 24 Getting the
last of the parts
ordered. MAC’s parts in
frequent discounts, prices a bit higher than most
people,
and very fast shipping as well as helpful people manning the phones.
Unfortunately they do not have much of an inventory, at least of late. Valve springs, pushrods, rod bolts and a heat
riser were all things I tried to buy and came up empty handed on. Pretty
routine stuff, too. I then got the valve springs and bolts from the
local auto
parts store. The pushrod was
interesting. Apparently there are three or four possible lengths so you
need to
measure yours. Since you’d like to get it right, it’s not really a job
for a
I am very hopeful the rod bolts are correct. Connecting rod bolts fatigue over time, microscopically. They suffer from “corrosion” and if they break, the results are disastrous. Any decent motor rebuild includes new bolts. The nuts, however, can be recycled. A comprehensive discussion of rod bolts can be found at the following link, among other places: http://www.eaa1000.av.org/technicl/rodbolts/rodbolts.htm .
I am sandblasting and painting the harmonic balancer and the power steering pulley. I have to see what color they are supposed to be but no matter what I do it will prevent the rust from moisture.
The exhaust manifolds need fresh bolts. They will get two stainless bolts (left side) and plain steel studs on the right side but with brass nuts. In both cases they should come apart easily in the future.
March 1 I am still lacking connecting rod bolts but they are supposed to arrive today or tomorrow, along with valve springs. The intake manifold has been reassembled as has the water pump/pulley/fan/spacer. Aside from reassembling the engine, the engine bay still needs painting on the lower part and the weather has been awful – nights around 10 degrees and days only in the lower 20s. The garage has a wood stove but I am fearful that if the surfaces are not warm enough, the paint will not adhere well and 6 months from now I will regret being hasty.
I have done a particular gamble and will find out this afternoon how it works out. I bought a complete, used, rocker arm assembly on Ebay. It was claimed to be in good condition. So my two concerns are: is it in decent condition (wear on contact surfaces of rocker arms/shafts)? and will it fit? It the answers are yes, then I spent $49 instead of $330 (new price, retail). If either is no then I wasted $49. See Feb 19 notes for the source of the problem.
March 3 The rocker arm assembly is pretty good, certainly a lot better than mine. Needs thorough disassembly, cleaning and lubrication. Also someone cut the springs on each arm but I can recycle mine. Care is needed in installing these as I learn there is an up and down, and also front and back to each shaft.
Gave up on rod bolts – no one seems to bother replacing them. Also they are pressed in and changing them would put the bearings in some jeopardy.
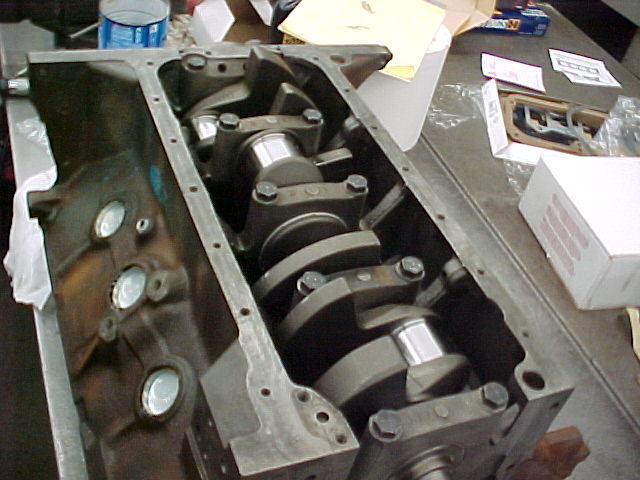
March 5. I go up to NH to Steve’s machine shop and we put in 7 hours assembling the bottom end – crank into block, pistons onto rods, rings onto pistons, pistons into block.
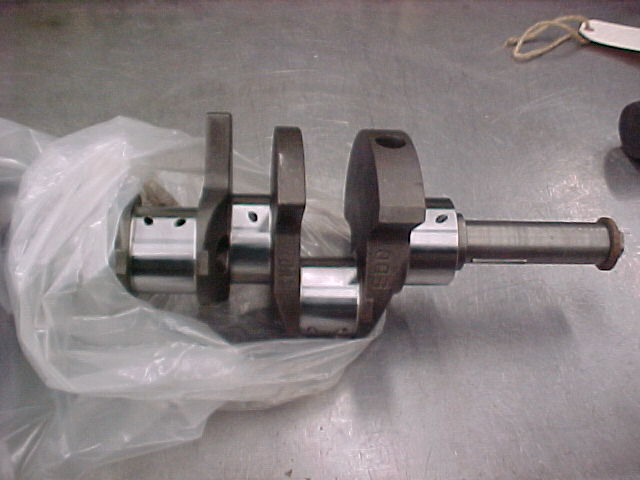
Some clearances: new crank to main bearings: .002” New rod bearings to crank pins: .001”. Top ring to piston (vertical) clearance: .003” (the old pistons had a horrible .015” clearance which spells oil consumption!). Ring end gaps: about .015”
My only real challenge left is to get the block clean enough to paint (Ford Blue). There is still a lot of rust on it. Wire brush helps but not completely. The heads look very good, however.
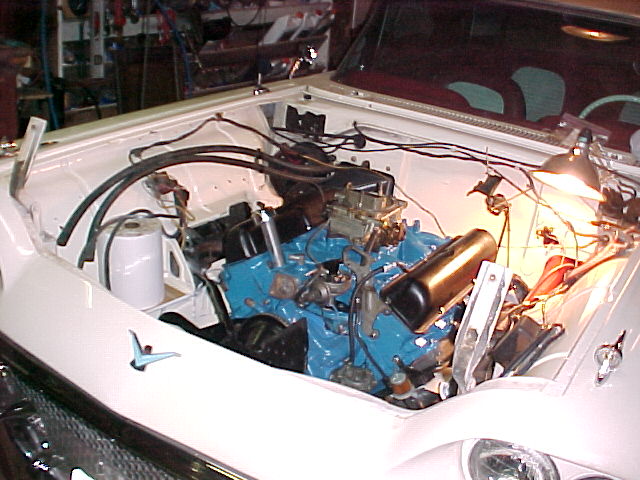
March 8 Steve and I put in about 12 hours on the motor. To the block above, we installed the heads, rocker arm assemblies, valve covers, intake manifold, timing chain and sprockets, timing cover, and oil pan cover.
We also double checked that the main bearing caps were on in the right order. They have very faint markings on them and also “front-back” arrows. We were ok. A couple people had posted that they had problems from mixing them up. Not sure how that could happen. The ends simply could not be swapped, and the middle is unique. That leaves #2 and #4. Now if the crank is newly machined, and the bearings are new they ought to be identical. Why not? Anyway, we were ok.
Comments on gaskets are in order; go with FelPro!!! The headgaskets are self sealing and do not need sealant or retorquing, which cannot be said for Brand X.
Steve went the extra mile to track down FelPro and we will not regret it.
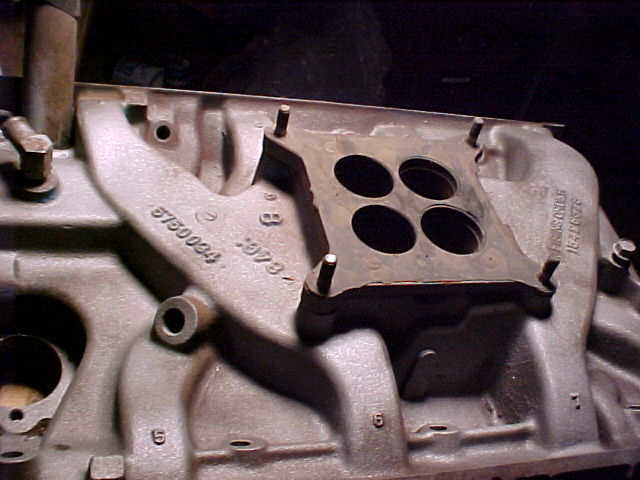
The intake manifold is no fun to install!! Even with two people. We completely did it twice as we were not happy with the first try, nor Brand X gaskets. The problem is mainly that it uses 4 gaskets: one on each bank and one on each end. This leaves you with two challenges: getting the ones on the end to stay in place as you install it and making sure the corners don’t leak. We finally put the end ones on with cement and left them for over an hour so they bonded, then put the manifold on (attempt #2). We also used some sealant around the water passages on each head. A little oil seepage out the back would not be a disaster but coolant leakage of any kind, especially into the oil, would be. I would not want to do this with the motor in the car!!
The timing chain assembly presented it own little challenge. The cam had a never (post 1960) end on it with a pin for the sprocket. The sprocket was compatible…so far so good. With this all in place, an eccentric cup goes on the sprocket which drives the fuel pump. A bolt goes through it into the cam and there is a locating pin sticking out of the sprocket to nail it in place. The second hole was about 1/16” off relative to my original cup. Tried filing the hole elongated but this is seriously hardened steel and you barely scratch it. Steve made a call to a salvage yard and got another cup very fast – probably used up several favors in the process!! The hole on this one was elongated perfectly.
We did not put the harmonic balancer on as yours truly had misplaced the Woodruff key for it. ¼” square bar stock was a tad too big so this was left as a small job for another day and time.
Having put the oil pan on twice from under the car, putting it on while the motor was upside down in an engine stand was heaven!! Always put the bolts into the timing cover first!! Then the other ones…. otherwise you won’t get the ones into the timing cover.
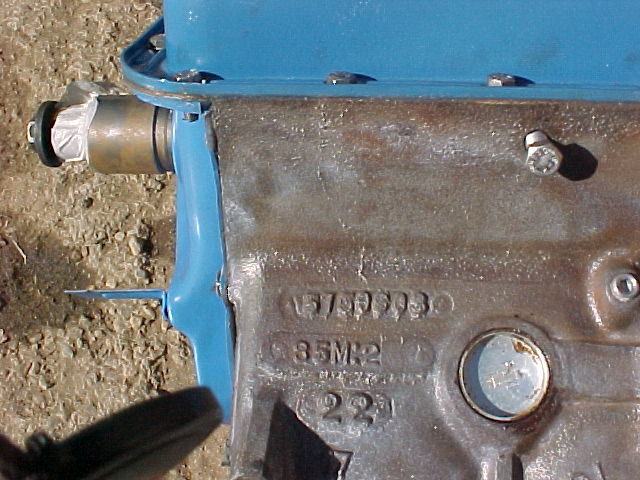
This shot shows the block casting number as the
motor is
upside down and out in the sun. The top number reads
5750603 indicating it is a 1958 352 motor
with hydraulic lifters. The number underneath is the date of
manufacture, 1958,
May, 13., 2nd shift. This is
correct for my chasis, which also has a
By
March 9 We get it out of the truck and into Ray’s garage.
The goal is now to get it painted and eventually in
the
car. To get it painted requires getting
it clean. Almost as soon as it was in
his garage it began to rust. The block is cast iron, which I quickly
learned
rusts far more quickly than bare steel. By the next day, the block had a
brown
aura to it. Sunday the 12th
was supposed to be an exceptionally warm day for March in
March 12 Easily the worst day of the entire project. I got the block out in the sun ready to go to town on it and get it painted. I had gotten various wire brushes, both for the drill and hand, CRC cleaner, Naval Rust Remover, and lacquer thinner. There is not much sheer surface area to the block and heads so how hard could it be?
Mistake #1: I used Naval jelly to get the rust off. Worked ok but then you have to get the Naval Jelly off! That was not easy at all, nor quick. What I should have done when I brought the block was to coat it with WD-40 and then clean that off with CRC or something and an air nozzle. So time was marching on and my opportunity to get the paint on was slipping away.
Mistake #2: having not used an engine stand before, and beginning to hurry, I neglected to respect how far off center the engine stand kept the motor. I wanted to work on the block from the bottom so I removed the pin and rotated it. Only once off balance it rotated quickly!!! and a valve cover hit me in the left kneecap as it came around. I was lucky not to break anything and, as it turned out, the swelling would take an entire month to completely leave. The short term was the pain of 3 or 4 root canals. This did little for my focus for the job at hand…
Mistake #3: I had used old spark plugs to keep the cylinders shut and have no cleaners or debris go in them. Good thinking. Only they stuck out a lot and were in the way. So I got some big bolts and put them in their place. Much better. Beginning to hurry, I picked up 4 smaller bolts for the second bank and put them in. As I was working, I heard “dink…..dink” as two of them fell in the cylinders…yes…into the cylinders. Now this is not the end of the world. You get a magnet on a rod and fish them out. Except that I have been trying to replace everything in the motor area with stainless steel bolts… far too little iron to be picked up with a magnet! Great…nice work!! Idiot! However the motor was on an engine stand so with some help we rotated it upside down. At that point the bolts appeared in the spark plug holes and were easily removed. Disaster averted…
By now the sun was heading west and the temp dipping. No paint today. Almost nothing accomplished. Sore knee. Battered ego. Success #1: go home.
March 19: we rolled the engine and stand some distance and put it in the basement. Ray was swapping a motor and would be out of the house for a couple of evenings so I could stink the place up in the 70 degree warmth of his very dry basement (he heats with wood). I spent easily three hours scrubbing, brushing and cleaning the block and heads. Finally there was no sign of dirt, rust or old paint. With it upside down, over a period of 2 hours or so I got about 5 thin coats of the DupliColor engine paint on the block and heads. It dries to the touch fast. The next night I got two coats of VHT clear engine sealer on. One way or the other , the job was done. Whether the paint stays on in the long run ,I believe I did everything I could to properly prepare the surfaces for paint. Time will tell.
The motor spent a week or so in the basement and due to a cold spell, I got no work done on the engine bay for a couple of weeks. The sore knee, a broken toe and some other mishaps probably did little for my eagerness, either.
April 1: I got in the engine bay and finally got enough sanding done to be ready to paint. The engine bay had been a mess towards the bottom due to heat and time.
It is like working on an old house. You have to make a decision where to stop restoring, you cant do the whole thing over. I cleaned off all of the lower frame, the front frame, battery area, and the firewall near the master cylinder (a real mess). Finally I got some Rustoleum Rusty Metal primer on it, a major point. The part around the master cylinder looked lousy, lots of cracks and crevices in the old paint. I finally used some spot putty to fill in the defects and went from there.
I had used Rustoleum Shell White for some touch up on the outside of the car with very good results. Inside the engine compartment, strangely, it was noticeably too white. So I got some Rustoleum Antique White, which has far more yellow in it, and it was essentially a perfect match. Who knew?
I also brushed the heck out of the bell housing and painted it a metallic silver , replacing the black, silver and rust. Additionally I took the master cylinder (new last year) and painted it with cast iron grey.
April 6: I finished an old obstacle, the rocker arm shafts. I had never properly cleaned out the insides of them. They have caps in the ends to allow cleaning but in order to remove the plugs, you have to wreck them, at least 1 out of 2. You drill a hole, put a rod through, and poke the one out at the opposite end. OK but where do you get new caps? No one even lists them. I had the old, worn out shafts, so I experimented on them. I got one cap out intact and it was about .530 or so in diameter, so I got freeze plugs of the same size for 60 cents each, These fit fine and I got some decent sludge out of the shafts. My fear was that one piece of sludge could clog a passageway and a rocker arm would then seize. Far too much work and expense to risk it. If you work on the rocker shafts, remember to record the orientation of the notches on the ends before you take anything apart. They make sure the oil holes are down and located correctly. See Steve Christ’s book on this.
April 7-14: lots of little details covered. Exhaust manifolds on with stainless bolts and copper gaskets. Water pump on, distributor on with new points static timed. Temp sensor on with ground wire soldered to it and grounded on one of the water pump bolts with an eye electrical connector so the temp gauge can read accurately. I used STP oil treatment to prelube anything that moves.
The generator had lousy paint due to damage from the leaky overflow tank so I stripped and repainted it with Rustoluem Gloss Black. Looks excellent and with all mounting bolts being stainless, the area looks good. I have also installed a 6 blade fan for better cooling. Ray and I rotated the motor over, watched valves and made sure I had #1 firing on the compression stroke, not the exhaust stroke.
We took the Holley carb apart to see how bad it was and save trouble later. It was not the original carb so it perhaps explained why the inside was extremely clean. A couple things were out of adjustment (floats) but most things were fine. The kit I bought provided a complete needle valve assembly for the front chamber so that alone was worth the bother. We also cleaned out the Autolite choke assembly The carb had worked pretty well before so things should go well. It is interesting to look at the complexity of an old carburetor, channels, passageways, linkage, arms and so on, and realize how simple and elegant the modern fuel injection is.
New Autolite 45 plugs come out of the box with a gap of nearly .050. They got reduced to .035.
At this point, I essentially have as new a motor as when Ford installed it in May of 1958. Everything has been replaced or refurbished. As it will have far better oil, better cooling, stainless valves and hardened seats, it is arguably a better motor.
I do have a totally refurbished Fomoco carb for it from Ponycarbs but that is a project for another day. Too many variables can make things confusing! The old carb got the job done so for the time being it stays.
April 14: I finally got the new transmission lines. Dan Stewart built them from scratch. The flexible parts were hard to find as the particular size is no longer used for much. Transmission lines must be good to 600 psi in case a regulator fails. These cost $120 for parts and labor. In terms of outside materials and work, this was the last obstacle. It had taken almost the 3 months since the project began to get the lines done.
April 15: Finally the engine gets put back in the car!! Working very slowly, it took about an hour and a half thanks in no small part to Ray’s experience. We took our time, cleaned bolts for the flywheel with a wire brush and then used Locktite and carefully torqued them to spec.
Below is Ray with the motor suspended on the engine hoist before it went in. Compare to picture with it coming out
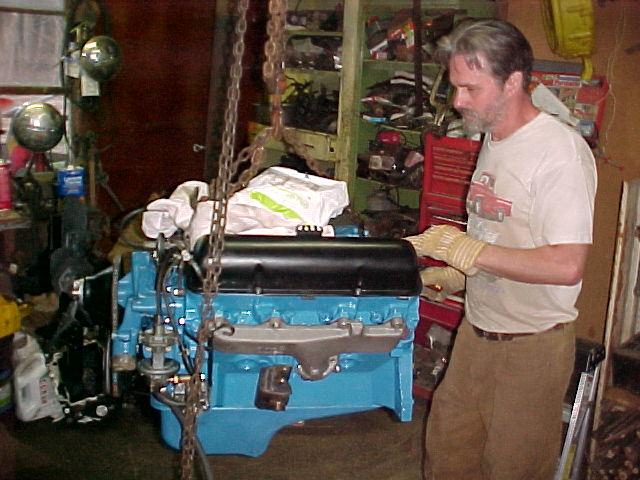
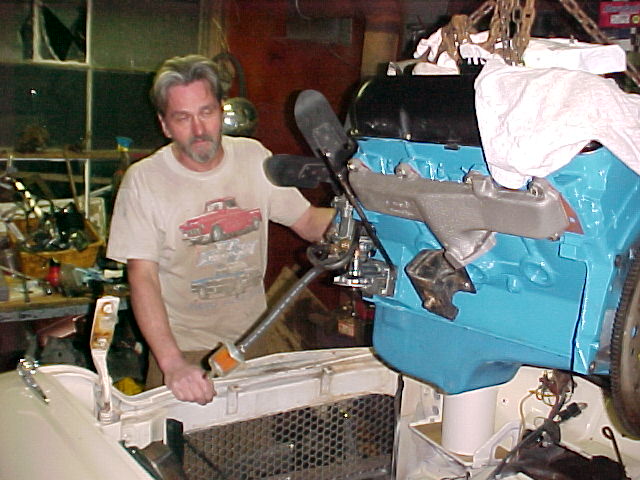
(Ray is sticking with that Chevy T shirt for as long as possible)
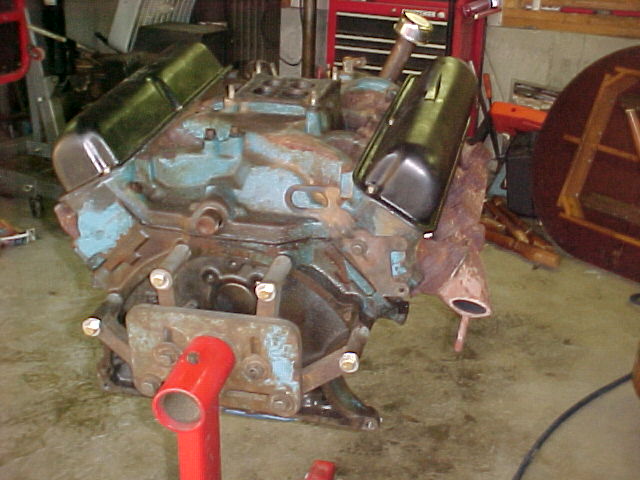
What is below is perhaps my best photo of how bad the original motor looked by this point in time:
The worst part of the installation was the driver’s side header to exhaust attachment. I had found bolts holding it together so I went with new bolts. Big mistake! I should have used studs. Trying to align the exhaust pipe, gasket and bolt from the underside was awful. The motor mount and frame piece are in the way and it took forever. The studs would have reduced one variable and I could have also stuck the gasket in place with a little silicon to keep it from moving around. However it eventually gave in so things are good.
The bell housing to motor fit was not bad. We wiggled and played with things for about a half hour but it did not go badly. There is a lot of room to work. Getting the studs from the torque converter into the flywheel (only 4) was not bad and the inspection cover on the lower side allows plenty of room to tighten them. We went with Loctite here as well…simply the last nuts you want falling off!!
April 16 Work to be done: starter motor,
torque all mounting bolts and nuts. Then electrical hook ups, install
cooling
system, circulate some oil before running, put plugs and distributor cap
in,
see if it runs!
April 19 Almost ready to start it. I poured nearly a quart of oil in the filter, took all the plugs out and cranked it over until the oil light went off. This took about 30 seconds or so. The totally empty motor took about 5 ½ quarts total.
I put new plugs in. Steve Christ’s book has an interesting note on routing spark plug wires. It concerns #7 and #8. One fires 90 degrees after the other one in the overall sequence. The concern is this: if the two plug wires are parallel to each other and close, then the spark traveling in one wire can induce a spark in the other one, leading to an explosion in that cylinder at a very poor time, perhaps trying to make the crank go backwards. His solution is to keep the wires at opposite ends of the routing fingers and perhaps at right angles to one another.
April 21 Went down to the garage with the intent of getting fluids in it and starting it. Wrong! The carb leaked in two places. The place where the banjo bolt goes into the master cylinder leaked. The latter is because I re-used the copper sealing washers…bad idea!! Some new ones from AutoZone took care of that. The carb is not giving up so easily. When we overhauled it, we put a new diaphragm into the bottom of the front float bowl where some kind of mystery arm connects. It clearly leaks. Finally I put the old diaphragm on and things are ok there. The rear float bowl may still be seeping… I have a paper towel against it to provide information. Fire extinguisher is not far away… just to ward off evil spirits. Gas will attack the Dupli-Color engine paint, by the way. Touch-ups later.
Finally…would it start? Run properly? Fall apart? Blow up?? Who knows?? Time to find out… It started… instantly. The lifters made noise for about10-20 seconds which told me that they had probably already gotten a lot of oil during my cranking of the motor. Steve Christ’s book said it might take minutes. Idled pretty well. All kinds of crap that had dripped on the exhaust went up in smoke. Tranny immediately needed more than two quarts of oil, lost during various operations. Engine needs more coolant which I have to track down at home. But we have reached an important point – it runs!! I started it a couple of more times in the process of getting tranny fluid into it, and both times were instant with good idle and no dark smoke out the exhaust. There’s hope!!
In the next 24 hours I hope to get it home and put the air filter housing and hood on it. As heavy rain is in the forecast here, this could be challenging.
April 23. Drove it home uneventfully, but only 1 mile. Carb and brake line still leak so small projects to be done. Ted helped get the hood on it so it is finally back in my garage, slightly over 3 months after the original trip down the road. The carb did not backfire out this time (a really neat sight at night with no hood and no air filter!!)…
April 26 Put 22 miles on it. Small leak between water pump and intake manifold …may have it fixed by moving and tightening the hose clamp. (This is a questionable design! Two different sized fittings.) Car runs fine, has plenty of power, no smoke, no overheating (cooling system is about
a quart or more low still). Main problem is setting up a PCV system as I have vapors coming out the rear of the intake manifold but no downdraft tube. I do have fittings to get this opening to ½ ID hose so I need the valve and a fitting on the air breather. Same comments about the oil filler cap which also breaths and needs redirection. However the main hurdle seems to have been cleared: the basic motor now runs correctly, makes no noises or smoke and offers lots of hope that the job will be a success! Details remain to be taken care of but the motor has gone from a collection of parts to a functioning unit, no small accomplishment for the amateur wrench twister!
April 28 Minor exhaust leak near the heat riser. Should have used exhaust cement in addition to the gasket. Still have leak near water pump but a second, slim hose clamp ought to take care of it (famous last words: ought to ).
May 5 Fixed a leaking valve cover. Water pump inlet still drips after you stop. Looking for Permatex exhaust system sealer. Car runs super, no oil used after 100 miles (old motor would be coming up on 1 quart used at this point).
Set up a PCV system. An old Ford fitting got me from the back of the intake manifold (large 1 ¼” opening) to ½” tubing to an off the shelf PCV valve from the auto parts store to 3/8” tubing to a fabricated T fitting from brass to connect the intake manifold and fuel pump up.
Conclusion:
at this point I believe the main part of the project is
over and
the engine has been successfully rebuilt. I still need to break it in
and fix
some minor problems. I put an oil pressure gauge on yesterday and got
about 55
or so psi at idle, cold, so we seem to be ok there. I will collect more
data
with it warm. The old oil pressure was around 10 at idle, hot, which is
pretty
marginal (10W-30 oil). There
is no more noticeable blow-by from the
intake, so the rings have probably undergone an initial level of
seating.
Resources
Services
& Parts
Robbins
Auto Parts,
Fisher Auto Parts, Zotoli Rd, Holden, MA 508-829-2703 - ask for Bob
Holden Home
and Garden,
Metal Strip
of
Ken Stewart Automotive, Gardner, MA 978-632-1090
as
the dreaded TBird overflow tanks from
hell
Pat Wilson Thunderbird Parts, Fredon, NJ http://www.wilsontbird.com/
Bill Hirsch Automotive Paint http://www.hirschauto.com/
Dunkin’ Donuts – everywhere.
References
Big Block Ford Engines, Steve Christ, HP Books NY ISBN 0-89586-070-8
The Chevrolet Racing Engine
Bill Jenkins. 1988. S-A Design Co.
Publishing, East
ISBN 0-931472-01-6
(don’t be misled by the title! Probably the most insightful and revealing book on 4 stroke motors ever written)
Squarebirds Web Site www.squarebirds.org
Friends of the Old
Car (in no particular order but all
thoroughly appreciated)
Steve
Ray
Mike
Joey
Ted
Jim
Johnston
my wife
(for putting up with all this)
Annie and
Amanda