-
John Pizzi - Squarebirds Administrator
Thunderbird Registry #36223
jopizz@squarebirds.org 856-779-9695
https://www.squarebirds.org/picture_gallery/TechnicalResourceLibrary/trl.htm -
The last 2 weeks I was doing reserve duty, so I couldn't do too much. Some of the things I've done before I left was send my seats out to get re-done (still waiting); put interior trim places back in place; and, install the rear seatbelt. Just some of the pics of late:
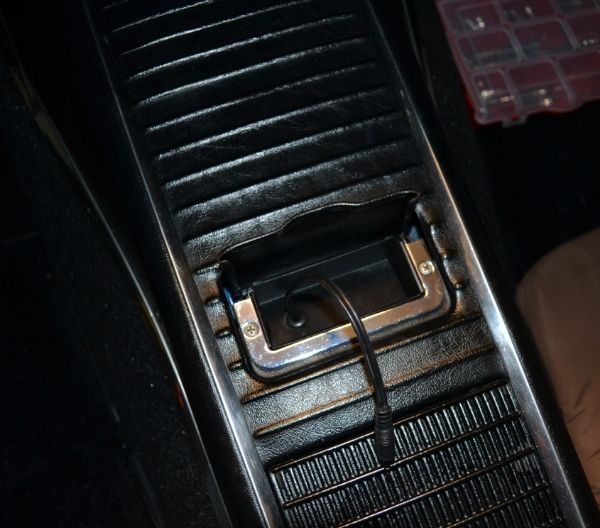
Re-installed the console. Input jack from RadioRad comes up through front ashtray
I used double-sided velcro to use as new window felt. I pulled out the staples and JB Welded the metal strip, then used Super Adhesive to glue one velcro strip to the metal, and then glued an additional velcro strip for thickness

Painted the front seat seatbelt brackets with texture paint. Should blend in with the new carpet well. Will be using black button-head bolts to blend in even more
Exterior outer brackets for the rear seatbelts my dad cut for me

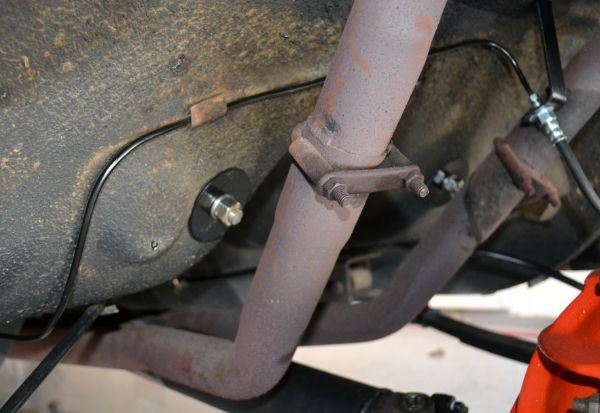
For anyone who plans to install rear belts, pull out the fuel line a little before drilling the driver-side belt hole by the fenderwell. I'll be putting some rubber hose around the fuel line so the nut won't wear into it

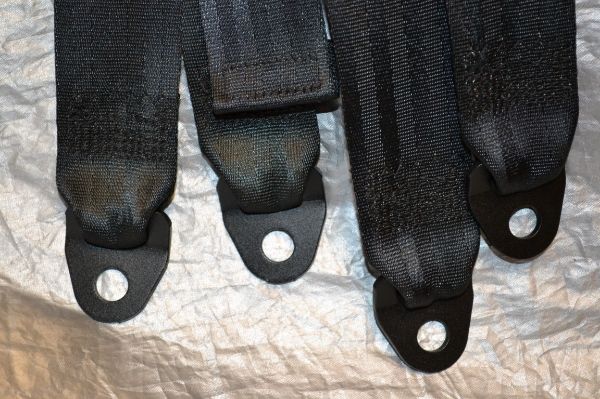
Inner seatbelts mounted. Still needs to get painted black
Some helper pics on where the dimples are. These are both on the driver's side


Finished product
[IMG]http://i261.photobucket.com/albums/ii57/dukejohnson99/TBird/re****atbelts3_zps6104b54a.jpg[/IMG]
I'm on vacation this week, so I hope to get my seats returned, and try to re-install the right 1/4-window. Warm weather this week will be greatly appreciated!1959 Thunderbird - Thunderbird Registry #46052Comment
-
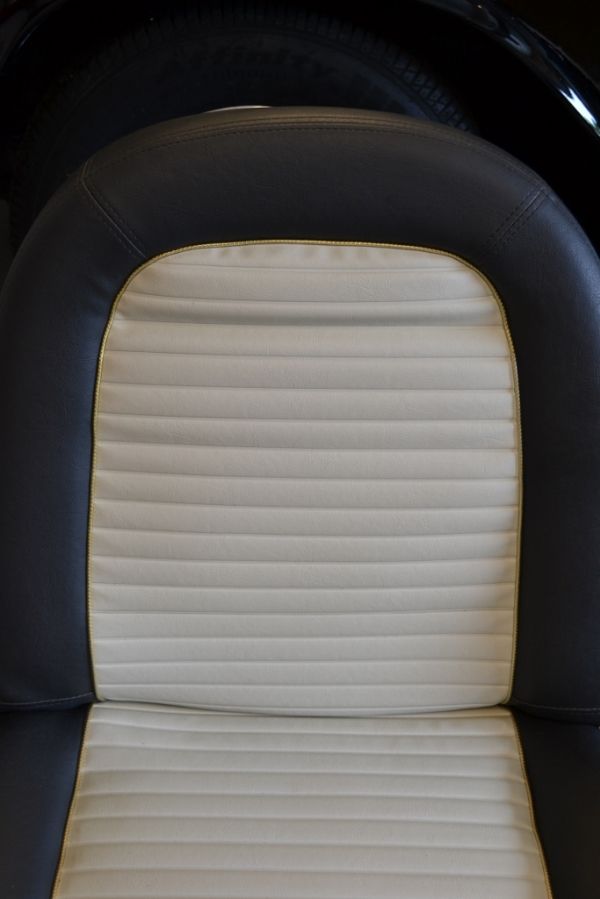
I finally got my seats back and they look like crap. The rear backrest won't fit back into place, and also leaves a gap below the rear deck. The foams are just too thick. Also, I got covers that look better on a boat. They are flat black, not shiny like the rest of the interior. The seams in the covers also don't match the originals.
I got these from Mac's and have talked to them. They said everything comes straight from their vendors. When they sent the wrong color covers, they were nice and shiny red. I have to send them pictures so they can pass it on to their vendors. I just hate to get new stuff that will be the same old wrong sizes and fitment.1959 Thunderbird - Thunderbird Registry #46052Comment
-
Did you use pre-made foam or did your upholstery guy fabricate it? Can you provide pix of the covers and the fit?
CarlComment
-
I just sent a slew of pics to Mac's. The foam was purchased from Mac's, also.
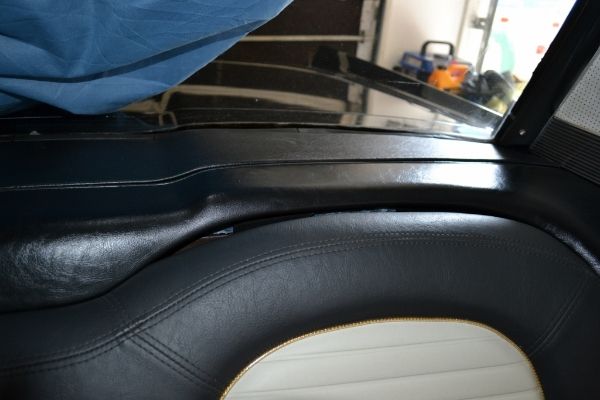
Two views of how the seams are different. He did the best he could to hog ring through extra thick foam. He says it must be about 2-3" too thick.


Rear seatback and gap. I can't even get the seat all the way up to even screw the bottom in.
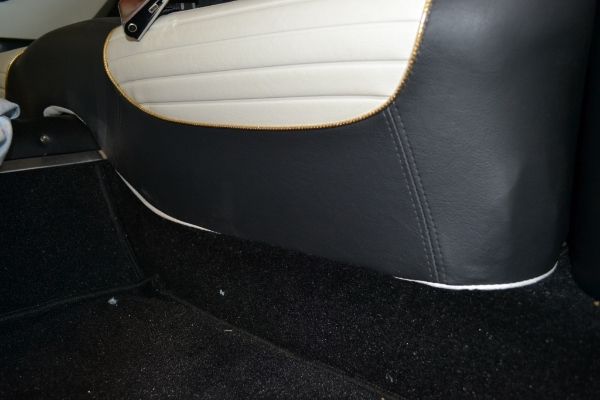
Rear bottom, and white showing when in car

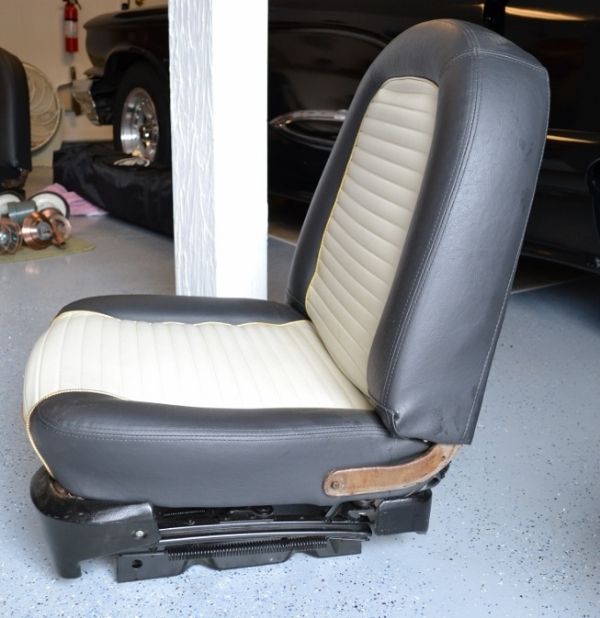
Front
My upholstery guy was mentioned in an earlier post about cushions and covers several weeks ago. He talked to some of his friends who do seats and they can't believe these are made for the '59.
The girl from Mac's said they'll review my pics and what I told them. Then I'll have get the covers and foam back off, ship it back, and hope for the best.1959 Thunderbird - Thunderbird Registry #46052Comment
-
I reconditioned my '60 leather rear seat covers and had an upholstery guy stretch them over new foams that I got from Jed Zimmerman here.
Like you said, the rear seat back was REALLY tough to get those two bottom screws to start. You gotta really lift on it while someone else works on the screws. At first I was afreaid I would have a gap at the top as well, but it all turned out good in the end.Comment
-
Wow, that IS bad.
I never liked the covers with heat-pressed pleats. I sew mine in with real thread.
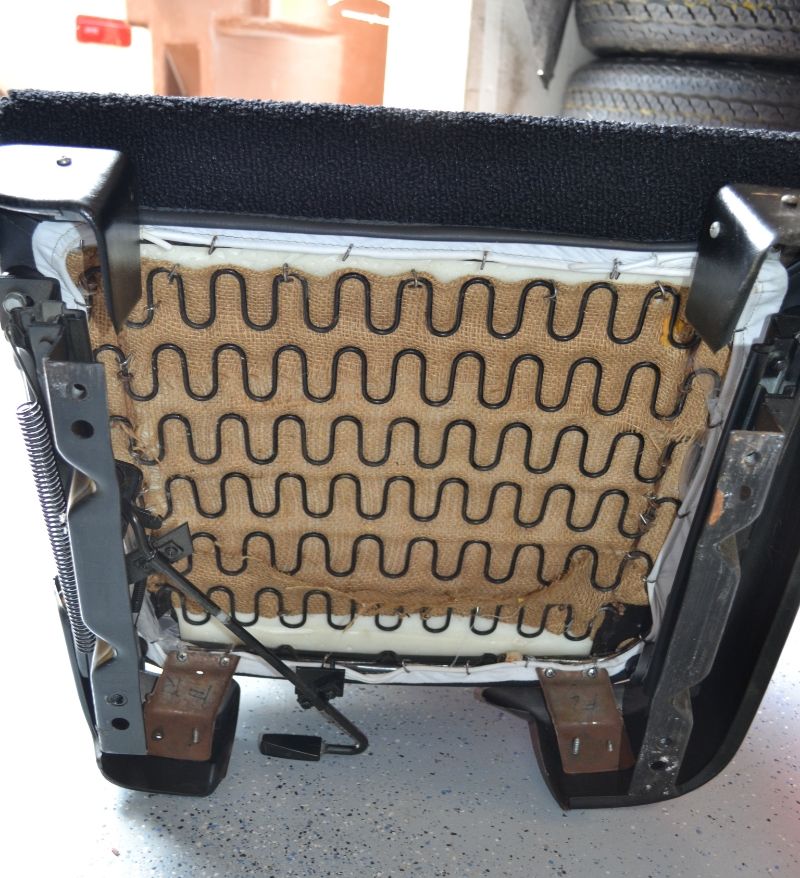
There are listing wires that hang down just below the piping (yours should be silver piping). By the looks of this job, the foams don't have proper relief or depth for the listing wires. Once those wires are hog ringed, the upholstery should be straight and pulled down, much more than yours is. The listing wires get hogged into the bottom and back springs, all the way through the foams.
I have no idea WHAT this is:
And I gotta say, part of this is your installer's fault. I'd like to see the under-side, where the hog rings are attached to the springs. This is just terrible, and I'm really surprised anyone would release this kind of work. He also tore the corner seam, trying to pull it down.
Too much foam is always better than not enough. It should arrive 'right' but, a simple turkey knife or sander will bring foam where it needs to be. Every good trimmer knows this. I hope you kept your original covers so you can compare the bottom sides to the new ones. If they are the same, go talk with your trim shop.
I like Mac's a lot, but none of this is their work. They simply turn it over for a profit. I like Jed Zimmerman's work (he makes foams by hand), and I sew my own covers using marine vinyl (and/or other materials that are UV resistant). That way I can control the depth of my pleats.
BTW, covers are 'close' but never exact. At the assembly plant, workers put the seat in a machine that pushes the cushion down far enough so the perimeter can be hog ringed properly. Your back seat wasn't done that way, but it should have been. That's why all that white border is showing. Again, I would have a serious talk with your trim shop. - DaveMember, Sons of the American Revolution
CLICK HERE to see my custom hydraulic roller 390 FE build.
"We've got to pause and ask ourselves: How much clean air do we need?"
--Lee Iacocca
From: Royal Oak, MichiganComment
-
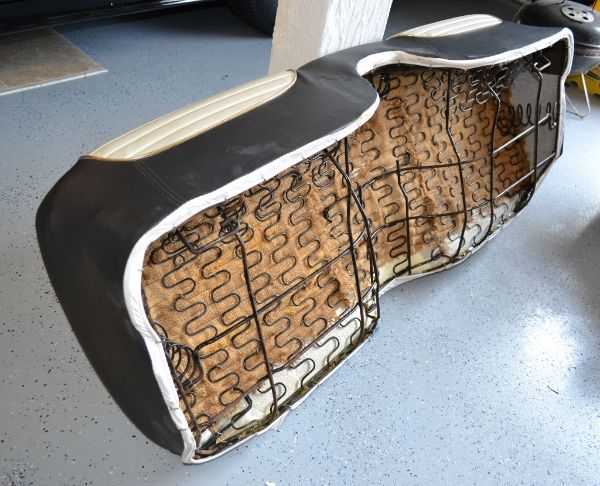
Here are those underside pics:


 1959 Thunderbird - Thunderbird Registry #46052
Comment
-
Went back and reviewed posts in this thread.
Excellent - very informative, please keep posting.
My 60 needs rear seat belts. Your pictures are helpful.
BillLast edited by FINSRIN; June 6, 2014, 03:08 AM.Comment
-
John, I'd like to draw your attention to this Youtube video about how to reupholster your Mustang seat covers. Squarebird and early Mustang seats are identical in the procedure:
It's a DIY instruction for first time seat cover installers.
At about 4:30, they talk about listing wires and listing wire channels. They make their own wires out of coat hanger or welding rod. Either way, these rods spread out the 'pull' of the hog rings, and they should look great when done. Notice how deep the foam grooves are. When heavy coat hanger steel is at the bottom of these channels, ain't no way they're going to bend. I have no idea what your installer used, but it bends and waves all over.
The video says to start at the top, then do the sides and finally the underside. Clearly, this cushion was not started at the top:
It looks to me like the top was done dead last, judging by the big wrinkle.
The listing rods should pull the welt down into the crease while the bolsters make the black vinyl rise up. These covers barely have any depth at all.
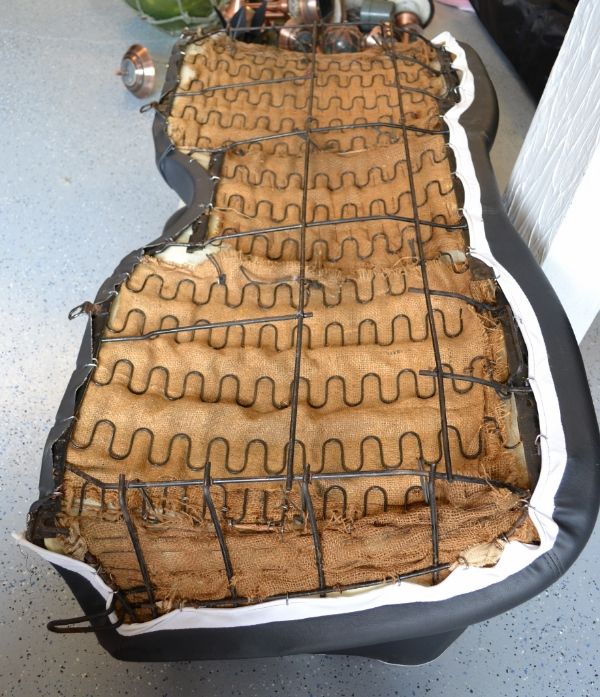
Original seats have small (spring steel) listing wires loosely woven through the burlap, spreading across all the springs, to spread out the passenger's weight:

I can see them in the back seat bottom but they have been removed from the front seat bottoms, and common burlap has taken their place. These small listing wires help support the foam from wearing through the 'Z' springs. They also make a better foundation for those listing channel wires. - Dave
CLICK HERE to see my custom hydraulic roller 390 FE build.
"We've got to pause and ask ourselves: How much clean air do we need?"
--Lee Iacocca
From: Royal Oak, MichiganComment
-
Another issue that I ran into is that when you close the door the arm rest digs into the side of the seat back. I have repro door panels but I believe that it is due to the seat foam being too wide.
JohnJohn Pizzi - Squarebirds Administrator
Thunderbird Registry #36223
jopizz@squarebirds.org 856-779-9695
https://www.squarebirds.org/picture_gallery/TechnicalResourceLibrary/trl.htmComment
-
Seat Cover Installation
This thread has been added to the Technical Resource Library (TRL) under a new heading called Seat Cover Installation.
Ray Clark - Squarebirds Administrator
The Terminator..... VTCI #11178 ITC #6000 Yellow Mustang Registry (YMR) #12188
Contact me via Private Message for my email address, or Call (Cell) 210-875-1411
https://www.squarebirds.org/picture_gallery/TechnicalResourceLibrary/trl.htm
Faye's Ovarian Cancer Memorial Website.
https://faye.rayclark.info/index.htmlComment
-
My son and I fought and finagled the rear backrest into position using brute force, punches, and a hammer. Looks fine. The bottom cushion is too fat to get in enough under the backrest, and is soooo close to catching on the brackets in the front.
The front seats were no problem, other than for some reason someone used a sawzall to cut the studs flush with the bottom of the seat brackets, or rails. Vice grips and some heat got them out. For a skinny guy like me with boney legs, I have to slide under the steering wheel, and my legs barely touch. My daughter is a little bigger than me and the wheel actually rests on her thighs. She asked if I could raise the wheel up any. I told her I don't think you can.
The front seat belts are in. Because of the tall seats, the belts are close to max. I got the 60" belts, I believe. I had to take out the rear outer belt bolts to get the backrest cushion in. A big crowbar lifted the corners out enough to get the bolts back in. Plenty of belt length for the rears.
We took Tony to his first car show of the year Saturday. With the new tires and wheels, and still crappy front end, we're limiting how far we drive it so the tires don't wear badly from bad alignment. I got a new tire for my spare and the trunk looks awesome. But, Megan didn't want it open during the show. She won $81 on Split The Pot! A few pics:


I'm out of town again, so I'll get some seat pics once I get home.1959 Thunderbird - Thunderbird Registry #46052Comment


 Tweet
Tweet


Comment