Announcement

Collapse
No announcement yet.

Heads and manifolds

Collapse
X
 
  • Time
  • Show
Clear All
new posts
  • DKheld
    Super-Experienced
    • Aug 27 2008
    • 1583

    Heads and manifolds

    Have an exhaust leak on my replacement engine on my Tbird.

    Long story short - I found a rebuilt engine cheaper than I could rebuild my original so decided to run it.

    Used original 1960 / 352 Tbird manifolds on the new engine because they have the flat exhaust connections - didn't need a new exhaust and for those not familiar with the Tbird specific manifolds they have an indention on the driver side rear to add more clearance to the steering box.

    The replacement engine has C4AE-G heads.

    My question is - do all FE heads have the same size exhaust ports and are they the same distance apart? Specifically will the '60 manifolds fit the '64 heads without leaking?

    I realize that originally the Tbird did not have exhaust gaskets and I was tempted not to put them back but every other car I've worked on had gaskets - MG's to Model A's and I've never had problems.

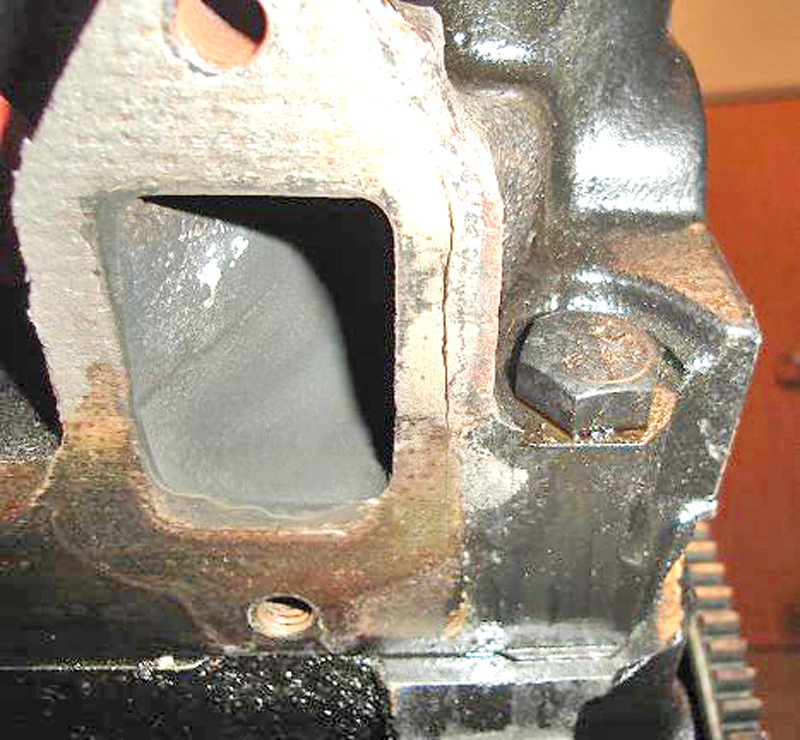
    It's leaking at the back of the manifold closest to the firewall. Take a look at the pic below - it almost looks as if the manifold is not long enough to cover the rear exhaust port. Caught it rather quick so not much exhaust residue to show the leak. The passenger side however is working fine.

    Plan to remove the manifold and have it surfaced then re-install with gaskets. I did not have the manifold surfaced the first time but checked it with a steel straight edge and it "looked" fine.

    Info, ideas and opinions appreciated.....

    Eric

    Sure is easy to pull the fan and water pump with the hood gone.

    Ok - the manifold....
    Oh - new bolts and washers - just took the pic after I had bent the tabs up to start the removal process. Also used permatex copper coat when installing the new gaskets and used manifolds. This is after about 1000 miles.
  • jopizz
    Super-Experienced


    • Nov 23 2009
    • 8345

    #2
    When I originally put the engine together in my '59 I used the gaskets just because they came with the kit. After a short time I had exhaust leaks on both sides. Since the car didn't have gaskets from the factory I removed them and went metal to metal with Permatex and so far so good. I noticed on mine that the passenger side exhaust manifold is very thin at the back and just barely covers the port. As far as the exhaust ports on the C4AE heads I'm pretty sure they are the same size.

    John
    John Pizzi - Squarebirds Administrator

    Thunderbird Registry #36223
    jopizz@squarebirds.org 856-779-9695

    https://www.squarebirds.org/picture_gallery/TechnicalResourceLibrary/trl.htm

    Comment

    • DKheld
      Super-Experienced
      • Aug 27 2008
      • 1583

      #3
      Thanks John.

      Still unsure about not using gaskets but when I cleaned up the used manifolds (wire wheel) there were a few slight nicks and imperfections in the surface so I thought the gaskets would be best. The original torq spec is 22-28 ft lbs without gaskets - went with 35 ft lbs on the bolts when re-assembling following a recommendation I had found on another engine that uses gaskets (Torino? can't remember).

      Since I plan on surfacing the manifold maybe I'll consider going without the gasket.

      Pulled the engine yesterday evening and will be measuring things today and of course I had to rely on the guy that sold me the rebuilt engine when he said the heads had been completely done. Could be that it is warped but it also checks good with the straight edge.

      Eric

      Comment

      • Ian M Greer
        Experienced
        • Jul 29 2010
        • 145

        #4
        Exhaust Manifold Leaks

        Eric , believe it or not but I have heard from many other owners that installing the original style metal gaskets work far better . Of co**** that is after running the engine with the locking tabs still open and then torquing after two or tree runs then bending up the locking tabs . Ian (REMEMBER NOT ALL BIRDS FLY SOUTH)

        Comment

        • simplyconnected
          Administrator
          • May 26 2009
          • 8787

          #5
          FWIW, I 'machined' my exhaust manifolds with a body file. They are absolutely flat and it only took me fifteen minutes per side because cast iron manifolds machine very easily.

          I put them on my seasoned, but newly machined heads without any gaskets but I used stainless bolts. There are no leaks.

          Heat/cool cycles anneal carbon bolts and eventually the bolt-heads erode to a smaller size. The threads inside the head never change which tells me the head draws heat away from the bolt. Stainless cannot erode because it has no carbon. Even if the bolts tarnish over a long time, they still look as good as the stainless ware in your kitchen.

          Use a high temp anti-seize on the threads and torque them up. FE manifold ports use twice as many bolts as modern engines so they should never leak.

          In my opinion, gaskets only serve to compensate for warped or misaligned manifolds. They are soft and cannot possibly be as hearty as two mating surfaces made of metal. The exhaust stroke is about as violent as a shotgun blast every time a piston fires. - Dave
          Member, Sons of the American Revolution

          CLICK HERE to see my custom hydraulic roller 390 FE build.

          "We've got to pause and ask ourselves: How much clean air do we need?"
          --Lee Iacocca

          From: Royal Oak, Michigan

          Comment

          • DKheld
            Super-Experienced
            • Aug 27 2008
            • 1583

            #6
            Thanks for the help guys. Plan is to have the manifolds machined and go back without gaskets. Went ahead and removed the pass side after seeing the drivers side (and while it's easy to get to with the engine out).

            The "blown out" area is where the manifold is thinnest - may have the shop add a bit of metal to the narrow area but that will probably just make it crack.

            The top bolt hole is at the bottom in this pic


            Look at this big old crack in the head!

            At least that's what it looks like. I scribed the head to see where the manifold bolted to the head. The leak and gasket failure was where the thinnest part of the manifold bolts to the head. Hopefully that will be enough area for the manifold not to leak when it's bolted back on with no gasket.


            Eric

            Comment

            • simplyconnected
              Administrator
              • May 26 2009
              • 8787

              #7
              Eric, I don't see any part that is too thin. I 'pushed' your head picture to see more but it's still too hard to tell if this is really a crack. I would need to dig into the 'crack' with a scriber to see how deep it is:


              Eric you know I love you, but I don't see a problem with the metal thickness so far and I certainly would not add more. Wire brush the surfaces to show how smooth they really are. If you have deep machining grooves that would be the only cause for concern. I cannot tell with that gasket material in the way.

              It looks like this gasket did a good job of shading your exhaust flow, which is another good reason not to use an exhaust manifold gasket.
              Member, Sons of the American Revolution

              CLICK HERE to see my custom hydraulic roller 390 FE build.

              "We've got to pause and ask ourselves: How much clean air do we need?"
              --Lee Iacocca

              From: Royal Oak, Michigan

              Comment

              • Joe Johnston
                Super-Experienced
                • Dec 23 2008
                • 720

                #8
                I don't think it is cracked.

                If it is, it may extend to the machined surface under the gasket and be more visible. Clean the area and take it to a machine shop to have it checked for sure. They have "crack checker in a can" than can be sprayed on and a crack will be evident as the material dries.

                Good luck and let us know what you find out.

                Comment

                • DKheld
                  Super-Experienced
                  • Aug 27 2008
                  • 1583

                  #9
                  No no no - that scratch on the head just looks like a crack - I was just kidding - it's just where I scribed the head to see where the manifold mated to the head.

                  So - here's how they turned out. Had an agreement with the machine shop to shave them as much as possible without adding any metal by welding as that would probably just make them crack.

                  Passenger side turned out fine.

                  Drivers side that was giving problems I'm still not sure about. A lot better than it was. Guy at the shop said the areas that didn't get shaved were deep enough that he would have to take a bunch more metal off to get down to those areas. Said he thought it would be fine as is. Hate to get it back in there and then still leak.

                  What do you guys think? Find another manifold , have them add metal and re-machine or just go with it?


                  Drivers side "crunched together" to save room on the pic


                  Eric

                  Comment

                  • simplyconnected
                    Administrator
                    • May 26 2009
                    • 8787

                    #10
                    Why add metal? Take it down another .020" and let that surface widen by itself. I don't see a problem. Also, before you bolt it down, take some of those tooling marks down. You can use a wide flat file for that.

                    Even if you decide to put it on the way it is, that will work. I mean, as long as it is flat, there is enough iron all the way around. I can't see any scant portions. - Dave
                    Member, Sons of the American Revolution

                    CLICK HERE to see my custom hydraulic roller 390 FE build.

                    "We've got to pause and ask ourselves: How much clean air do we need?"
                    --Lee Iacocca

                    From: Royal Oak, Michigan

                    Comment

                    • DKheld
                      Super-Experienced
                      • Aug 27 2008
                      • 1583

                      #11
                      Thanks Dave

                      The fellow at the machine shop said he could build up the valleys in the seal area so that he didn't have to take the rest of the manifolds down so much. He said he was already taking off the factory casting numbers with where he was - which wasn't a problem - but said even if he went all the way down against the center of the manifold there would still be a little unsurfaced area in the seal according to what he measured.

                      That one inner seal area would get better with more surfacing but the outer edges won't widen any - there is no more metal out there. That's another area he said he thought he could weld to and build up to make the surface wider but like you mentioned - he thought they would be fine as is.

                      Think I'll just cross my fingers and go for it. If it doesn't work I'll see if I can better my last engine pull time of 5 1/2 hours by myself. It's just so much fun and I've got nothing better to do

                      Eric

                      Comment

                      • DKheld
                        Super-Experienced
                        • Aug 27 2008
                        • 1583

                        #12
                        2 1/2 hours this morning. Sandblasted the manifolds and painted then re-installed (yes I did tape off the newly machined seal areas). Looked great although after sand blasting I did find a crack in one of the mounting tabs at the base. Went ahead and drilled it out and welded it. Probably won't last. If I do this again I'm getting a set of headers - PERIOD - tired of the cast manifolds.


                        Engine went in without much fight - hardest part is getting the darn flywheel and torq converter lined up. That A/C plenum holds the transmission down just far enough that the engine mounts get in the way when you try to push the engine back into place. Oh well - at least it finally went in - just laying there - needs to be bolted in and all accessories put back on.

                        I need to get another fender protector . Lucky it was just a brass button on my jeans and will wax out.


                        No car fun this afternoon - had to clean up early for a percussion band concert - but it was cool.
                        I'll update the thread when I get it all back together and running. Probably be next weekend though.......

                        Eric

                        edit - oh - did find that the '64 heads are a bit longer than the '60's on the original engine. Didn't have a chance to measure them but the manifolds on the original engine go outer edge to outer edge. With these replacement manifolds from another 1960 engine on the '64 heads there is about 1/8 inch space on both ends. Couldn't measure the exhaust port distances (which are probably the same) because I still have the original manifolds bolted to my original engine.

                        Comment

                        • DKheld
                          Super-Experienced
                          • Aug 27 2008
                          • 1583

                          #13
                          More fun.....had a day off this week so decided to try and finish the Tbird to see how those exhaust manifolds work.

                          But first.......

                          Rebuilt my fuel pump about 15 years ago. Never had been sure the seals in it would stand up to the ethanol in fuels these days so figured I would rebuild it while the engine was out. Last time it took me about an hour and had never rebuilt one before - fairly simple. This time it took about 4 hours .
                          Biggest problem is you are told to file off the metal that has been braded and holding the washers and seals in place. That's not the bad part - then you are supposed to re-brad your washers and seals back on there with half the metal it had originally. (the kit years ago already had the seals on new shafts - just swapped them out - easy). I finally decided to drill a small hole in what was left of the top of the original shaft and hold the seal and washer in with a cotter pin with loctite (topped off with JB Weld) rather than try and re-brad with the small amount of metal that was left. Still not really convinced it will last. The kit seemed to be good quality though otherwise.

                          Dead camera so didn't get any fuel pump pics - DANG IT - almost decided to see if the camera could fly. After lunch I picked up some new batts.

                          On to the rest - just as I was tightening down one of the last bolts - it broke off in the intake manifold. Decided it was time to quit for the day. Wasn't very tight at all so hopefully it will just come right out - oh wait - what am I thinking - we're talking about my car and my luck - so guess I'll probably end up having to drill it out and install a helicoil.


                          Also decided to add my 1972 Ford Thunderbird flex fan. D2VY8600A The A/C style fan has been cooling great but is a bit noisy at high rpm on the interstate. Thought the flex fan might quiten it down a bit and still keep me cool in traffic. Have to use a Summit Racing #876 - 2 inch spacer. Only leaves about 1 inch between the radiator and front of the fan and 3/4 inch clearance between the back of the blades and expansion tank.

                          All 3 fans for comparison - original, A/C and 72 Tbird. (left to right)


                          Originally black - painted it white like the original then installed it...


                          Why don't I paint that tank? Well.....it's original and I like it


                          Eric

                          Comment

                          • pirate
                            Newbie
                            • Mar 28 2004
                            • 18

                            #14
                            C4AE G heads are off a 427 low riser the valves are much bigger but the ports are the same. You have some great heads.

                            Comment

                            • DKheld
                              Super-Experienced
                              • Aug 27 2008
                              • 1583

                              #15
                              Thanks Pirate - that's good to know.

                              As an update - I finally got it all back together. The broken bolt only took about 15 min to pick out - it was in fact loose in the manifold so just used a screwdriver and tapped it out until I could get a hold on it with some needle nose pliers. Maybe my luck is changing.

                              Runs nicely again - no exhaust leaks!!! Guess we'll see if this lasts more than 1K miles - meanwhile I'll be researching headers because I don't have much confidence in the manifold that I had to weld the crack in the mounting tab.

                              My newly installed 72 Tbird flex fan SUCKS !!!!

                              No really - I had these black flecks all over the fenders after I cranked it up. Couldn't figure out where they came from - thought it was the original black fan paint under the white paint I used - nope. Then I realized half the paint had been pulled off the back side of the radiator fins Sure forces a bunch more air at idle which will help with the A/C.

                              Only had it up to about 60 mph one time but it sounded much better. We'll have to see how it does on the 2 hour interstate drives I usually make. The fan might not be as loud but will it still cool when it's "flexed".

                              Got a short video of it in action but I'll have to figure out how to link to it.

                              Eric

                              Comment

                              Working...
                              😀
                              🥰
                              🤢
                              😎
                              😡
                              👍
                              👎